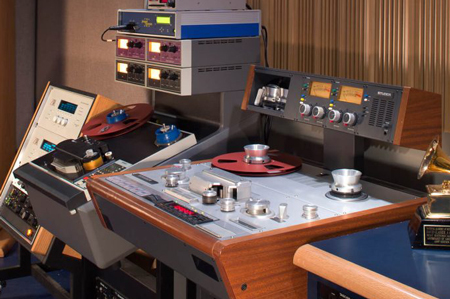
This year we’ve had a lot of analog tape pass through the studio, so I figured it’s a good time to spread some info on the ins and outs of tape, and the capabilities at Airshow for transferring, archiving, and mastering from analog tape.
We see new recordings that are mixed to analog tape, transferred from a digital source to tape, and of course, older legacy recordings destined for commercial release or archiving.
If you are contemplating adding an analog tape machine to your workflow, I’ve written before on what to consider when shopping for a machine.
If you have an analog machine and want to get the best results in your studio – and in our studio when we master from your tape – here are some practices to follow.
Keep vintage machines maintained
The first thing to keep in mind is there have been no new tape machines manufactured for over 20 years, and most tape machines around are much older than that. Which means that periodic service, maintenance, and calibration is mandatory. As great as recording and mixing to analog tape is, a poorly maintained and improperly aligned machine can do irreparable damage to your tapes and your music.
As old, mechanical devices, all tape machines should receive a mechanical inspection by a qualified technician, and any faulty guides, bearings, rubber rollers, etc. should be repaired or replaced. Dirty heads and guides are your enemy. Even a microscopic piece of dirt on the heads will degrade the high-frequency response. I clean the heads and tape path (with isopropyl alcohol) before every reel, and often, before playing back each song. You should too.
Alignment and set-up tones
You should align your machine for every session! It’s not the plug and go of digital workstations. You’ll need an MRL Alignment tape for every speed you use, and a stable oscillator. An oscilloscope set for X/Y is invaluable for adjusting azimuth (You can use a phase scope plug-in for this as well, but I prefer an old-fashioned o-scope.) After alignment, print set-up tones at the head of the first session reel, and if you want me to be happy, print them to every reel.
Here are the tones you should include: 1kHz at operating level, 10k, 15k, 100, 50, Noise Reduction tones if used. The low frequency playback EQ alignment should be set when the machine is in record, monitoring playback. Budget the time to do this. A stereo machine takes me around 30 minutes to clean and align, A multitrack machine will take several times that. During the mastering session, we’ll use your tones to calibrate our playback machine to exactly match the machine used to record the tape; so take your time doing this, and separate the tones from the mixes with leader tape.
Wear and tear
Tape heads wear out. Plan on periodically re-lapping (re-contouring the head profile) and eventually replacing tape heads on your machine. If you can see–or feel with your fingernail–a ridge on the face of the heads, it’s time to have them serviced. JRF Magnetics is the go-to company for tape head repair, maintenance, and fabrication. John French has built at least four of our Ampex and Studer head stacks.
 There have been great albums recorded on all sorts of tape recorders, but a small handful of machines stand out. I’ve been using tape recorders professionally since 1975 and have worked with many models from Ampex, Studer, Scully, MCI, 3M, Otari, and Sony. In the world of 1/4” and 1/2” machines, the Ampex ATR-100 series, Studer A820, and Studer A80 are the best-built, best-sounding, and longest-lasting. We own two of these.
Our Ampex ATR-104 was built in 1979, and re-conditioned in 2000 by the late Mike Spitz of ATR Service Co. Our Studer A820 was manufactured in 1989. Over the years we’ve performed several modifications to these machines, and amassed a collection of head stacks giving us the capability to play back almost every 1/4” and 1/2” tape format – from 1/4” full track mono to 1/2” 4 track (and the obscure 1/2” 3 track format used in the 50’s and early 60’s) – at any speed from 3 3/4 to 30 ips. Both machines have vari-speed.
Playback electronics vary, too
On the ATR, we have four playback electronics options to choose from–each with a slightly different sonic flavor: 1) Stock ATR repro card and I/O, 2) Stock repro card and transformerless I/O, 3) Stock repro card direct to our transfer console, and 4) Plangent Processes repro electronics, with the features needed for transfers optimized for Plangent’s wow & flutter and speed correction processing.
Our Studer A820 has a transport that is very gentle on tapes and is ideal for transferring delicate archival recordings.
Noise reduction
If you use noise reduction on your recording, then it must be played back through the proper noise reduction system (with accurate alignment). Airshow has Dolby A, Dolby SR, and dbx type I and II noise reduction units.
Plangent Processes
Airshow is an authorized transfer facility for Plangent Processes, a unique and revolutionary technology that can eliminate wow & flutter and other speed anomalies from analog recordings. We have used Plangent on most of the Grateful Dead projects mastered here, as well as recordings by Doc Watson, Joan Baez, Pete Seeger, Horace Silver, and others. We’ve written about it here.
We welcome projects on tape. We’re happy to discuss any further details as you are making production decisions. When all the decisions about tape format, noise reduction and alignment were made by someone else 40 years ago, we have the range of tools to present archival audio in the very best way possible.
Here are links to vendors for further info:
https://www.plangentprocesses.com
Here are links to our other posts about analog tape:
Analog Tape Series, Part 2: How to Keep Your Tape Deck in Top Condition
Analog Tape Series, Part 3: Studio Settings and Collaboration
Keep Your Recordings Safe: Best Practices for Analog Media Preservation
Here are links to vendors for further info:

